I started Project Life last year and loved doing it. After a few weeks the picture editing and printing got to be too much. I bought a Canon Selphy but the quality was less than what I hoped for even for the project.
I gave up after 19 weeks because it was so difficult to get a true 3x4 photo printed without jumping through hoops for the programs that did offer it. I gave up. It just wasn't worth the hassle. I researched different programs and options but nothing worked easily. Or it wasn't compatible with a Mac.
I decided to do PL again this year but instead of a weekly 2 page spread, I focused more on the monthly type layouts. I will not take 30 pictures each week and try to fit as many as I can in. And with Picasa, I can get the true 3x4 printed 2-up on a 4x6 sheet of photo paper. I read on a message board that Picasa has a template. They sure do!
Took me 10 minutes to select the photos, upload them to Picasa and then print them. I'm actually excited to work on my PL again and I love my monthly spread so much better!
A quick tutorial:
STEP 1: Once you've downloaded Picasa, the program will import all of the photos on your computer. (I have a Mac so my screen might look different than yours.) I already have all of my photos sorted in folders the way *I* like them so I just ignore the folders in Picasa. I have a Project Life folder for each month. As I take photos with my camera or phone, I upload them here for end of the month editing.
STEP 2: Select two photos that you want to import to the 4x6 canvas. To make things easier, I use the flip tool at the bottom to flip my pictures to the same orientation. Hold your shift key down and click on each photo with your mouse.
STEP 3: Click the 'Create Collage' button. You'll get the preview below. This is where you can edit the photos as well.
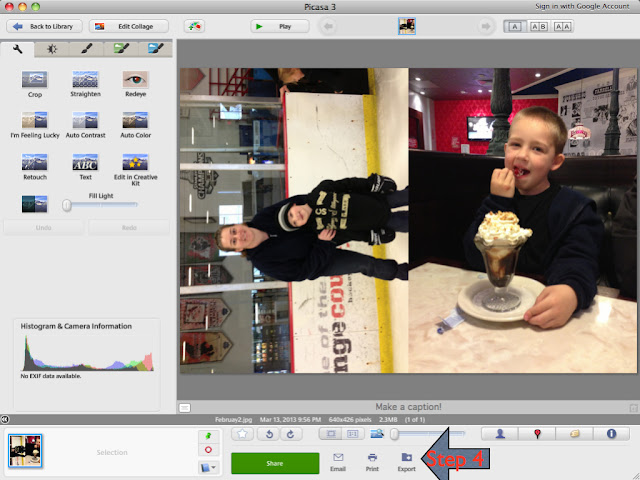
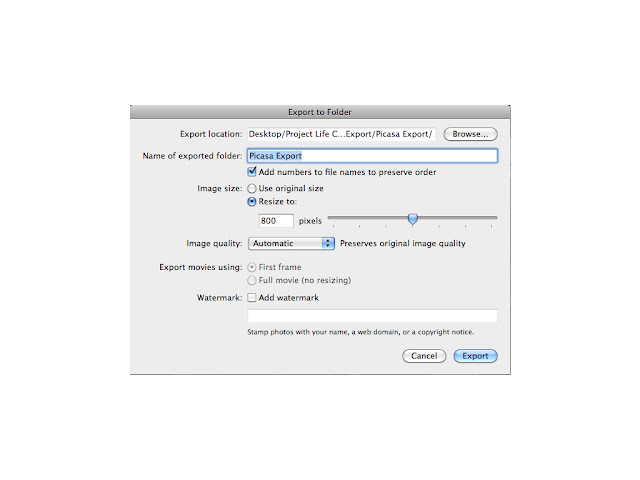
STEP 4: Click the 'export' button to save the photo to a folder on your computer.
STEP 5: Save the photo and print! I use my Canon Pixma to print once I've got all of the collages saved.
Final product looks like this:
You can upload these to any online processor if you don't have print at home capabilities.
January PL Pages
And since there are virtually NO purple products out there I had to make my own. Luckily, I didn't have to look too far. Studio Calico just released a limited edition set of mini Mister Hueys which included this cool purple. Now, the Kings don't have purple in their jersey/logo anymore but they will always in my mind. Plus, these pages needed a pop of color. I stuck with black/silver and white throughout and added the purple. The hearts and stars are from Pink Paislee and the sticker letters are from Basic Grey. I used some black and white ones (tinted purple).

To get the purple letters I used a small paint brush and dipped it into an open Mister Huey. I used several coats to make sure I got the color I wanted. I also have about 10 sheets of this font because I like to keep white on hand for projects like this. If you use mists or any other water based color agent, you'll want to let the letters dry for a few hours. Using them while they're went will cause them to rip. Avoid using a heat tool to dry them quicker. This seems to melt the adhesive. I've attempted this several times and figured out the best way to do this. Not all sticker letters will be the same but with these BG ones, this is the best method. Air dry works best. For this project, I laid everything out, planned my page and then colored the letters I needed. While they were drying, I was washi taping, gluing and decorating the 4x6 cards. The last step was adhering the dry mini letters.